Kling · Kling in Professional Practice
Kling for Filmmakers
Visualize any scene before the shoot
Kling for Filmmakers
Today, imagine you have a screenplay and need to show your cinematographer, actors, and investors what the film looks like.
In this lesson, you'll learn how to use Kling to turn a script into visual references, scene stills, and animatics in a single session.
Choose one
You need to give your crew a clear visual idea of a scene before the shoot. What's the most practical first step?
Step 1: Generate a Scene Image
Kling's Image Generation takes your script description: location, lighting, character positions, and mood, and turns it into a reference frame your whole crew can look at and respond to.
Let's make one. Describe a scene from your script and generate the image that goes to your cinematographer.

practice preview
Interactive practice
Fill in the blank
Generate a reference image from a script description in Kling Image.
You have an image with location, mood, lighting, and character position. If you need to compare two different lighting setups before committing, you can generate both as separate stills and decide before anything gets locked in.
Choose one
From a filmmaker's perspective, what do you think generating a scene still in Kling changes about the pre-production process?
Now that the crew can see the scene, let's show them how it moves.
Step 2: Animate the Still Into a Moving Clip
A still shows the look, while a moving clip shows the feel: how the camera travels and the character moves through the frame, and how long the scene breathes.
Upload your still into Kling's Image-to-Video, describe the motion, and you have a clip your producer and director of photography can watch.
practice preview
Interactive practice
Fill in the blank
Upload your scene still and turn it into a short 10-second moving clip.
Great Work!
This is your clip! Your producer can watch it, your cinematographer can plan from it, and no camera or location is needed to make it.
Step 3: Build a Storyboard With Custom Multi-Shot
Now that the still and motion are covered, let's lay out the full scene.
Custom Multi-Shot lets you specify every shot in a scene individually: framing, angle, transition. Each one comes back as a moving cinematic clip. Let's build it with the generated video.
practice preview
Interactive practice
Fill in the blank
Use the video and generate a four-shot storyboard sequence using Custom Multi-Shot mode.
Excellent!
Location is set, action is played out, and movement is tracked. This is your complete moving storyboard from a set of text instructions.
Choose one
What did Custom Multi-Shot specifically help you do in that storyboard task?
Storyboard done! You now have a visual sequence that shows how the film looks and flows shot by shot.
Next, let's go one level deeper: directing exactly how a camera and a character move.
Direct Precise Movement With Motion Control
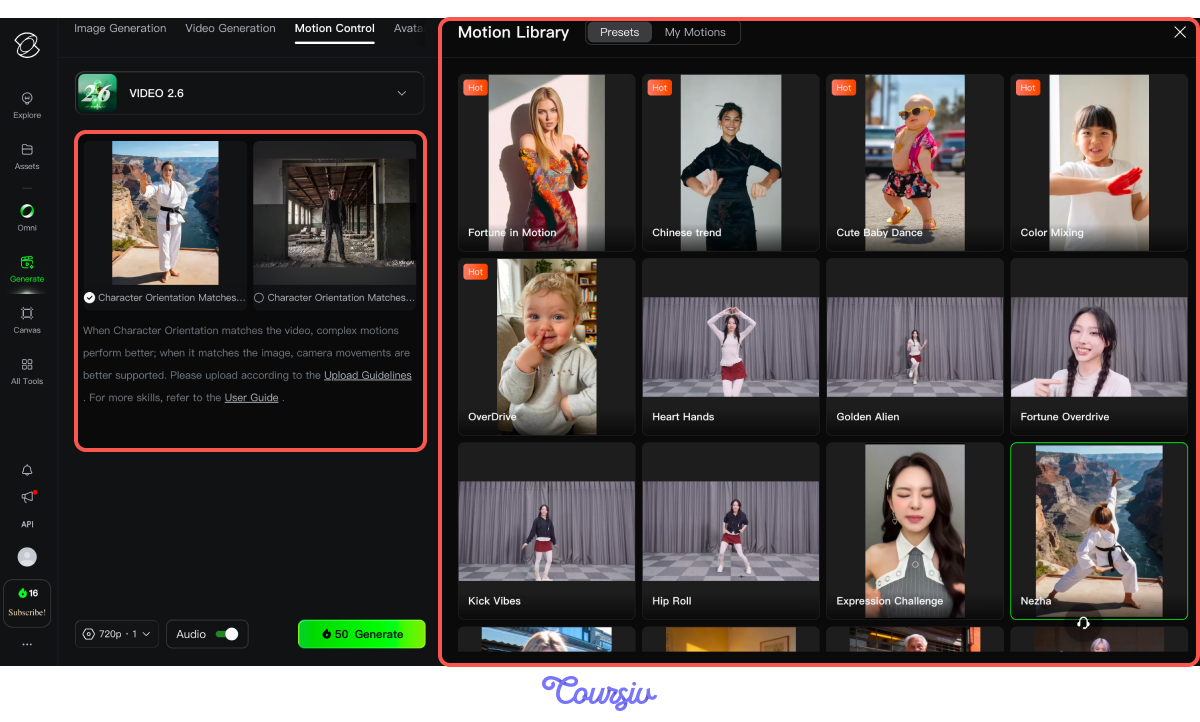
Motion Control lets you define exactly how a character moves. Upload a reference action video or pick a preset from Motion Library, add a character image, and Kling mimics that movement with your character's face and body.
Let's try the workflow:
- Choose preset from Motion Library showing the movement you want to copy.
- Upload the character image alongside.
- Click Generate.
Perfect!
The preset video set the motion, and your character moved through the frame in the same way. You can choose or upload any reference action video that aligns with your vision.
practice preview
Interactive practice
True / False
Decide if this is a useful case for Motion Control.
Follow these steps to build a solid storyboard and turn it into a film you can shoot:
- Step 1: Scene Stills. Describe location, lighting, character position, and mood; get a reference frame your crew can see before the shoot.
- Step 2: Image-to-Video Previs. Animate the still to show camera movement, blocking, and scene timing in motion.
- Step 3: Custom Multi-Shot Storyboarding. Specify each shot individually; every panel arrives as a moving cinematic clip in one generation.
- Bonus Step: Motion Control. Upload a reference video and character image, bind the facial element, and direct the camera move precisely.
You've gone from a script description to a scene still, a clip, and a full storyboard without a crew. Keep that momentum going!
In the next lesson, the same tools move into marketing, and you'll see just how fast a product idea turns into a campaign-ready asset.